How to Back-Up Bookmarks in Firefox

Bookmarks is an easy way of remembering website we visit often. There are chances that Firefox may crash because of a new add-on installation, theme installation or any other reasons. It is always good to have a back up of data especially the bookmarks in Firefox. Taking a back up of bookmarks is pretty simple process and basically there are two methods to back up your Firefox bookmarks;

Method-1:
Go to Bookmarks->Organize Bookmarks in the main menu.


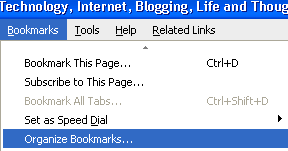
This will open up the Bookmarks Manager window. In this window you can see all the bookmarks saved. Go to File->Export and save the file in the preferred location. The file will contain all your bookmarks and will be an .html file. Whenever you install Firefox in another PC or re-install in your PC, you can import all the bookmarks through File->Import and select the option From File in the Bookmarks Manager.


Method-2:
Second method is directly taking a back up of the bookmarks.html file from the profile folder of the Firefox application. To do this navigate to this folder-
C:\Documents and Settings\<your profile name>\Application Data\Mozilla\Firefox\Profiles\ati9z0wb.default
In this folder you can find a HTML file by name bookmarks.html. Take a copy of this file and paste it in the desired location. Thats it, next time if you install Firefox, import this file using the steps mentioned above.

Update: The folder ati9z0wb.default may be different for different profile

Connect Your SkyDrive In Windows Explorer

What is SkyDrive Explorer?


SkyDrive Explorer is a free, easy-to-use, but very powerful extension for Windows Explorer. With SkyDrive Explorer you can make any every-day operations with your documents from Microsoft Live SkyDrive™ service (read more...) using Windows Explorer, as if they were on your computer.

Moreover you don't need to install and configure any additional programs or ActiveX components. SkyDrive Explorer will organize the interaction with the online storage itself.


Installation Guide

Download SkyDrive Explorer

How to convert your existing physical workstation to a virtual machine quickly and easily

Microsoft has a free application named Disk2vhd, which can create a virtual hard drive (VHD) of your existing operating system. A couple of cool things you should know about Disk2VHD:

* It can convert the chosen hard drive into a VHD file, even if it is in use.
* It's portable – no installation is required

Why would you do this?

* Working on another machine - This could come in handy in a couple of situations, such as if you are going to be working on another system, but you still want access to your PC. Just take the VHD with you on a portable drive or flash drive.

Steps to Create the VHD

Here are the steps to create the virtual machine of the existing Windows OS on your physical computer:

1. Download the Zip file and extract to a local drive, portable or flash drive. The just double-click Disktovhd. exe.

2. Disk2VHD will show you the available drives in your computer.

3. Select the drive you want to migrate as a virtual machine. If your OS and apps are installed on C:, select that drive from the interface.


4. Specify the path where you want to save the VHD file. As you can see, the drive is going to be pretty large.

5. Click the Create button. It will take a few minutes to create the vhd file, so you'll have some time to get a cup of coffee whilst it runs.

The software will clone a virtual hard disk of the drive selected and save it in specified location. After the vhd file has been created, you can use any virtualization software to mount the virtual hard disk and run the operating system as a virtual machine.


Download Disk2VHD

CHANGING a current local login profile to a domain profile

When joining users to the domain. Copying their current profiles to new profiles, this will takes a very long time.

There's a way to CHANGE their current local login profile, (without creating a copy as that will take up lots of space and time,) to a domain profile

1. Log onto system.

2. Go to start/run/regedt32

3. Locate key - HKEY_LOCAL_MACHINE\SOFTWARE\Microsoft\Windows NT\CurrentVersion\ProfileList

4. This will show all readable profiles on the machine, it may but probably will not show information leading to the users original profile.

5. Navigate to C:\Documents and Settings\UsersName and note the profile name of the original profile, usually the same minus the domain information. Make a note of it.

6. Now go back to regedit and manually edit the duplicate profile location in the ProfileImagePath key to that of the original e.g:

Original - %SystemDrive%\Documents and Settings\jsmith
Duplicate - %SystemDrive%\Documents and Settings\jsmith.domain

Change the duplicate to point to the original profile, save the change.

7. Now have the user log back in, and they should now again be operating on their original profile

"Windows cannot modify the drive letter of your system volume or boot volume."

I checked the "My Computer" window, and F: drive was assigned to my primary hard drive. C: and E: drives had been assigned to my the 2 slots in my 7-in-1 card reader as "Removable Disk(s)", and my CD drive was designated as D: drive.
 
So how do I change the drive letter names within Windows XP so that C: represents my primary hard drive? I can manually change the current drive letters set for the 7-in-1 card reader using the XP Disk Management snap-in, but when I try to change my hard drve's letter, I receive an error message that says "Windows cannot modify the drive letter of your system volume or boot volume." 
 
Solution:


1. Start regedit
2. Go to the following registry key: HKEY_LOCAL_MACHINE\SYSTEM\MountedDevices
3. Find the drive letter you want to change to (new). Look for "\DosDevices\C:".
4. Right-click \DosDevices\C:, and then click Rename.
5. Rename it to an unused drive letter "\DosDevices\Z:". This frees up drive letter C.
6. Find the drive letter you want changed. Look for "\DosDevices\F:".
7. Right-click \DosDevices\F:, and then click Rename.
8. Rename it to the appropriate (new) drive letter "\DosDevices\C:".
9. Click the value for \DosDevices\Z:, click Rename, and then name it back to "\DosDevices\F:".
10. Restart the computer.
 
Here is a link to a Microsoft Knowledge Base article that provides the instructions.
http://support.microsoft.com/default.aspx?scid=kb;en-us;223188

"Unable to find a certificate to log on to the network" while you connecting to wireless


you probably have 802.11n authentication checked and make sure that the box
next to "Enable IEEE 802.11x ..." is NOT checked.

1. On the PC, in Control Panel | Network Connections, right-click on the Local Area Connection and choose Properties.
2. In Local Area Connection Properties, go to the Authentication tab.
3. In the Authentication tab, uncheck Enable IEEE 802.1x authentication for this network.

Windows XP Logs off automatically while login

I'm not able to login to Windows. As soon as login, the windows show applying settings, saving settings and logs off automatically without logging in.This situation is really very troublesome.


The main reasons behind this problem is a corruption in the registry key which holds the value of the files which are executed while login to windows. This registry key can get either replaced with some incorrect value or it might get corrupt due to some virus / trojan activity. Lets see how to fix this issue.


Solution:

Fix with BartPE
 
 
Bart Lagerweij's PE Builder is a utility that allows you to create your own bootable CD-ROM ("BartPE") by extracting the necessary files from your Windows XP installation CD. PE Builder lets you add other applications by using "plugins".

Another extremely useful feature of BartPE is the ability to create a boot CD-ROM that provides network access. Yes, you can even surf the Internet from such a CD-ROM. Watch our tutorial on YouTube about creating a BartPE Boot CD-ROM.

You can use Bart PE to check whether userinit.exe exists in C:/windows/system32. Then make sure check explorer.exe to be there in C:/windows. Then try to copy an userinit.exe / explorer.exe of your pc to this pc.

Open up the regedit tool from GO menu to check the registry. In the registry, locate this entry HKEY_LOCAL_MACHINE\SOFTWARE\Microsoft\Windows NT\CurrentVersion\Winlogon\ and at this entry there is a key names userinit, double click on the key and set its value to “C:\WINDOWS\System32\userinit.exe,“

I got it working by doing the following:
1) copying C:/Windows/system32/userinit.exe to C:/Windows/system32/userinitnew.exe
2) using tool from above to edit registry and set the winlogon value to point to userinitnew.exe


Exit the registry editor, restart the infected computer. This will work for most of the computers.
 For those computers which still don’t let you login, you need to run a repair setup on such computers.To run a recovery setup, see this link.


 Download BartPE

How to remove "Warning! Visiting this site may harm your computer!"

I recently came across this spyware from my customer pc.

"Warning! Visiting this site may harm your computer!" Screen is Dangerous
" This web site probably contains malicious software program, which can cause damage to your computer or perform operations without your permission. Your computer may be infected after visiting such web site.
We recommend you to install (or activate) antivirus security software. "

I have a choice to either “Continue Unprotected” or “Get security software”. When you choose get security software then it will be redirected to the purchase page of whichever rogue is being promoted.


Download YouTube Videos Easily using 3outube


Looking for a super fast and easy way to download YouTube videos? 3outube.com might be your answer. While watching the video, simply replace the “http://www.y” part of the URL with the number “3”. Download link will appear and you have your video.


3outube.com

Getting your Iphone to work with Exchange Active Sync

 1. To add an Exchange account to your iPhone, tap Settings, then Mail, Contacts, Calendars, then Add Account, then Microsoft Exchange. Note, you can configure only one Exchange account per device..


Turn Your Windows 7 Laptop into a Wi-Fi Hotspot


This free tool helps you turn your Windows 7 laptop into a Wi-Fi hotspot and share your connection with others. Connectify is free to use but you have to register before downloading it.


Connectify

Unable to access kingston 128gb pen drive with eXFat format in XP


Since a lot of you weren’t (and still aren’t) too excited about Windows Vista, you might not have noticed the exFAT file system before.
It’s the heir apparent to FAT32, and it can finally cope with large files and drives. What’s new? For starters, exFAT has been tweaked to provide faster access and allocation, adds support for UTC time stamps, and provides increased compatability with flash media.
Gone are the 32gb drive and 4gb file size limitations. The only problem is that exFAT isn’t native to Windows XP – which the vast majority of you are probably still running.
Problem solved. Microsoft has released KB955704 to address the issue. Download it from their site and install it, and you’ll be able to seamlessly work with exFAT partitions in XP.

Use a Web OS to Get Work Done and Store Files In The Cloud (G.ho.st)

There are a lot of services these days that let you store files in “the cloud” and access them from virtually anywhere. These services are extremely handy, but what if you need a mobile operating system as well? Today we take a look at a couple of online operating systems that let you store your files and work on them as well.

Online operating systems are a good solution if you have say a Mac at home and PC at work. Or maybe certain features of Windows aren’t available on different machines you work on during the day. There are a lot of different scenarios where an online operating system could come in handy. Here we take a look at two such apps which have a lot of functionality and are free to use.

G.ho.st
This is a worthy free Web OS that gives you 15GB of storage and offers an office suite (powered by Zoho), sharing and collaboration, and access to your documents on a mobile device. The OS runs in a separate window of your browser and has a lot of neat functionality. Everything you do is saved and will be exactly the same no matter what computer you use to log into your account. The Go button acts like the Start menu on Windows and gives you access to all of the available apps and other utilities.


How To Setup a USB Flash Drive to Install Windows 7

If you have a netbook and would like to upgrade it to Windows 7, you may be wondering how to do it without a clunky external DVD Drive. Today we show you how to install Windows 7 from a USB flash drive.
Installing Windows 7 from a flash drive is essentially the same as installing it from a DVD.

Most of the work is setting up your flash drive so it becomes a bootable device with the OS on it. Here we will take a look at a couple of utilities that will allow you to easily create a bootable USB drive and copy Windows 7 to it.

Note: You’ll need a minimum of a 4GB flash drive to dedicate to the installation files.

Windows 7 USB/DVD Download Tool

If you have an ISO image of Windows 7, using Microsoft’s free utility is a quick and easy option to get the image on your USB flash drive. It requires XP SP2 or higher and if you’re using an XP machine you’ll need .NET Framework 2.0, and Microsoft Image Mastering API V2…both of which can be downloaded from the link below. It seemed to work best if I formatted the flash drive as NTFS before using the download tool. But that could be because of the flash drive I used…your mileage may vary.