File Recovery - Recuva and Disk Digger

Accidentally deleted an important file? Lost something important when your computer crashed? No problem! Recuva recovers files deleted from your Windows computer, Recycle Bin, digital camera card, or MP3 player. And it's free!


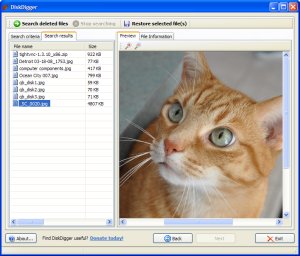
Restore that File or Photo using DiskDigger

If you don’t have any luck with Recuva, you can always try out DiskDigger, another excellent piece of software.

Note that DiskDigger doesn’t require installation, making it a really great tool to throw on your PC repair Flash drive.

Start off by choosing the drive you want to recover from…


Download Recuva from piriform.com

Download DiskDigger from dmitrybrant.com


  • ADD


  • Move


  • ADD


  • DEL


  • Move


  • ADD


  • DEL


  • Move


  • ADD


  • DEL


  • Move


  • ADD


  • DEL


  • Move

  • ADD

  • DEL

  • Move

    Performance Tuning Guidelines for Windows Server 2008

    This guide describes important tuning parameters and settings that you can adjust to improve the performance of the Windows Server 2008 R2 operating system. This guide describes each setting and its potential effect to help you make an informed decision about its relevance to your system, workload, and performance goals.

    This paper is for information technology (IT) professionals and system administrators who need to tune the performance of a server that is running Windows Server 2008 R2.
    This information applies to the Windows Server 2008 R2 operating system.

    Included in this white paper:

    Choosing and Tuning Server Hardware
    Performance Tuning for the Networking Subsystem
    Performance Tuning for the Storage Subsystem
    Performance Tuning for Web Servers
    Performance Tuning for File Servers
    Performance Tuning for Active Directory Servers
    Performance Tuning for Remote Desktop Session Host (formerly Terminal Server)
    Performance Tuning for Remote Desktop Gateway
    Performance Tuning for Virtualization Servers
    Performance Tuning for File Server Workload (NetBench)
    Performance Tuning for Network Workload (NTttcp)
    Performance Tuning for Remote Desktop Services Knowledge Worker Workload
    Performance Tuning for SAP Sales and Distribution Two-Tier Workload


    Performance Tuning Guidelines for Windows Server 2008

    Improve Hyper-V performance with configuring antivirus exclusions

    Let’s look at what exclusion configuration should look like. On Hyper-V host you’ll find couple of core processes that’s crucial to host and VM performance.

    Prevent following processes from AV scans by excluding following as part of Hyper-V AV policy:  
    VMMS.exe | VMWP.exe.

    Also exclude root directories where VM configurations and Virtual Hard Disks are stored:  
    C:\ProgramData\Microsoft\Windows\Hyper-V   
    C:\Users\Public\Documents\Hyper-V\Virtual Hard Disks, Custom VM configuration, Virtual Hard Disk and Snapshot directories
    .

     Next, create AV exclusions for following file extensions:  
    *.XML | *.VHD | *.AVHD | *.VFD | *. VSV | *.ISO. |*. BIN

    • XML files
      • These files contain the virtual machine configuration details.  There is one of these for each virtual machine and each snapshot of a virtual machine.  They are always named with the GUID used to internally identify the virtual machine or snapshot in question.

    • .VHD files
      • These are the virtual hard disk files for the virtual machine

    • .AVHD files
      • These are the differencing disk files used for virtual machine snapshots
    • .BIN files
      • This file contains the memory of a virtual machine or snapshot that is in a saved state.

    • .VSV files
      • This file contains the saved state from the devices associated with the virtual machine.

    Finally, if you’re using Hyper-V R2’s Live Migration feature with CSVs, then you’ll need to exclude CSV path and any sub-directories. CSV path is as follows: C:\Clusterstorage. Failure to create this exclusion on hosts using CSV, can only result in poor performance, but can also result in a missing or corrupt VM configuration.


    Guidelines for Antivirus Exclusions

    Should virtual machine snapshots be used in production?

    The short answer is “Virtual machine snapshots are supported in production environments, but not recommended.”  The longer answer is that there are a number of issues you should consider before deciding to use virtual machine snapshots in a production environment.  The are as follows:

    • Performance: as virtual machine snapshots use differencing disks, there is a performance overhead to be considered.  This overhead is not too noticeable if you are already using dynamically expanding virtual hard disks, and you only plan to have a small number of snapshots around.  If you are using fixed size virtual hard disks – then there will be a noticeable performance hit to using a virtual machine snapshot.
    • Disk space: once again, because virtual machine snapshots use differencing disks, there is an added disk space usage involved with having a virtual machine snapshot.  This is not too significant if you are using dynamically expanding virtual hard disks – but is more pronounced if using fixed size virtual hard disks (hint: do not use fixed size virtual hard disks and virtual machine snapshots together, it works but does not make a lot of sense as you lose most of the benefits of using fixed size virtual hard disks).
    • Downtime: if you create a virtual machine snapshot and then delete it, you will have to turn the virtual machine off at some point in the future to let the snapshot AVHD file merge in. 
    • Clustering: unfortunately, if you use snapshots on a virtual machine that is part of a cluster, the snapshots will have incorrect network configurations after they have been moved from one node to another.
    • Physical disks: if a virtual machine has a physical disk connected directly to it – you cannot use virtual machine snapshots.
    So in summary: if you are using dynamically expanding virtual hard disks, have planned the location of your snapshot files, and can tolerate downtime at a later point in time to allow deleted snapshot files to merge – then go for it.  Otherwise you may want to carefully consider the usage of virtual machine snapshots in production.

    The reason that for people using virtual machine snapshots in production environments is that they want to have a safe point to return to before applying a patch / installing new software / making a configuration change.  While it is a bit more work you can use VSS snapshots just as well for this sort of scenario – and you avoid the issues that I have outlined above.

    Use Scan.pst To Repair Outlook

    You may need to use the Inbox Repair Tool if you open your Outlook .pst file and receive this message:

    "Unable to expand the folder. The set of folders could not be opened. Errors could have been detected in the file drive:\Documents and Settings\user\Local Settings\Application Data\Microsoft\Outlook\Outlook.pst. Quit all mail-enabled applications, and then use the Inbox Repair Tool. "

    Included in all versions of Outlook is Scan.pst, a tool that may help in the event your .pst file becomes corrupted. Run scan.pst repeatedly until there are no errors.

    To get at it, you'll need to navigate to this path using Windows Explorer:


    For Outlook XP & 2003: Hard Drive Letter:\Program Files\Common Files\System\MSMAPI\LocaleID (which is 1033 for the USA or similar)


    For Outlook 2007: Hard Drive Letter:\Program Files\Microsoft Office\OFFICE12. Now, inside this folder, you're looking for this particular setup file: "Scanpst.exe" When you run the .exe, you'll need to Browse... to your current .pst file and hit Start:


     The Inbox Repair Tool will now scan the corrupted .PST file for errors:


    If your PST file is recoverable, you'll see the repairable errors show up in the scan results. To fix them, select Repair.:


    Transferring Recovered PST File Data to New PST File

    Once the repair finishes, Outlook creates a "Recovered" version of your .pst file, and you need to tell Outlook to use it rather than the old, damaged or corrupted .pst file.Next, you'll need to point Outlook in the right direction, namely at the recovered .PST file: Start Outlook Normally Special Note: If Scanpst.exe wasn't able to repair the .pst data file, you may need a stronger repair tool. Try scanning it with the Stellar Phoenix PST repair utility. Select Go from the top menu, choose Folder List:


    With the Folder List open, you should see a Recovered Personal Folders folder with the usual Outlook Personal Folders, or a Lost and Found option.If the Lost and Found folder has a file that the Inbox Repair Tool successfully fixed, it will show up here.

    If it's empty, the Repair Tool was unsuccessful.If you do see a fixed .pst file in the Lost and Found box, you'll need to create a new .pst file to move the repaired file(s) to. After you've simply dragged the files over from the "Recovered" .pst file to the newly created .pst file , you can turf the Recovered Personal Folders contents.

    Get Detailed PC Hardware Information with HWiNFO32


    Are you someone who likes to dig really deep into the hardware configuration of your computer? If so, HWiNFO32 is probably the best program ever for getting detailed system hardware information on the processor, hard drives, video cards, network cards, OS, and more.

    HWiNFO32 – System Hardware Information

    Optimize your computer the Microsoft way


    Nice article with suggestions on how to keep your PC running smoothly. Topics include Disk Check, Removing Temp Files, Defragmentation and other suggestions on how and when to run built-in Windows tools. All OS’s.

    Optimize your Windows computer

    Roadkill’s Scan Port scans for open ports


    Find your PCs open ports quickly with Roadkill’s tiny Scan Port scanner. Ports filtered by a firewall will easily be identified too.

    Download Roadkill’s Scan Port v1.3